
Assignment 1: Socket Programming and Measurement
Released: 01/23/2024
Due: 02/04/2024
- Part 0: Overview and Setup
- Part 1: Write iperfer.c
- Part 2: Measurement on a Virtual Network
- Submission
- Grading
- Appendix. Kathara Basics
Part 0: Overview and Setup
Overview
Your task is to complete src/iperfer.c to meet the specifications in Part 1 and perform measurements using your program in Part 2.
Note: You should instantiate your experiment in the same way in A0.
- Make sure to use profile
cs356-base - Make sure to specify your group during instantiation.
If you cannot see the
Groupoptions yet, please contact TA through Ed or email.
Note: Don’t forget to execute below for every CloudLab experiment instantiation.
- After ssh to the reserved node, type the commands below.
$ sudo usermod -aG docker $USER - Then restart the SSH session to make sure the changes are applied.
Setup
You SHOULD save changes you make to your private GitHub repo. Otherwise, you will lose the changes when your CloudLab experiment ends.
-
Get the skeleton code for A1 and setup your private repository.
To get the skeleton code, create a private repository by clickingUse this template> Create a repositoryon the GitHub repository. Don’t forget to selectPrivatewhile creating the repository. -
Setup GitHub authentication on a CloudLab node
When you want to make changes to your private repository on a CloudLab node, you have to authenticate every time you instantiate an experiment. This is because your authentication information is cleaned up upon the end of the experiment. There are three ways to authenticate your account on the reserved node.With SSH key and SSH agent forwarding (recommended)
- Prepare a key pair that is registered for your GitHub account.
- Refer to this to add a new ssh key to your GitHub account.
- Check if the key is added properly with
$ ssh -T git@github.comon your local machine.
- Setup a local
ssh-agentand SSH to the CloudLab node with the SSH agent forwarding option (-A).For macOS and Linux:
- Launch a local SSH agent.
$ ssh-agent - Add your private key to the agent.
$ ssh-add <path_to_your_private_key> - SSH to the CloudLab node with the
-Aoption.$ [ssh command] -A- To automate step a and b, append the below to your shell startup file (e.g.,
.bashrc,.zshrc). After this, you do not have to repeat step a and b every time.eval "$(ssh-agent -s)" ssh-add <path_to_your_private_key>
- To automate step a and b, append the below to your shell startup file (e.g.,
For Windows:
- Open a terminal as an administrator and follow the steps below.
- Launch a local SSH agent and automate the launch.
> Get-Service ssh-agent | Set-Service -StartupType Automatic> Start-Service ssh-agent - Add your private key to the agent.
> ssh-add <path_to_your_private_key> - SSH to the CloudLab node with the
-Aoption.> [ssh command] -A
- Launch a local SSH agent and automate the launch.
- Launch a local SSH agent.
- You should be able to clone your private repository with the SSH URL on the Cloudlab node.
- Check if the ssh-agent forwarding works properly with
$ ssh -T git@github.comon the CloudLab node.
- Check if the ssh-agent forwarding works properly with
With VS Code
With personal access tokens
- You can generate a personal access token for the account/repositories to access your repositories over HTTPS with the token.
- Refer to this for more details.
- Prepare a key pair that is registered for your GitHub account.
Part 1: Write iperfer.c
Your task is to complete the source code for iperfer. iperfer is a program to measure the throughput between two hosts. It should be executed on one host in the server mode and then executed on the other in the client mode. Argument parsing is already implemented in the skeleton code. Refer to the below specifications for implementation details:
- Client mode: Send TCP packets to a specific host for a specified time window and track how much data was sent during the time window.
- Usage:
./iperfer -c -h <server_host_ipaddr> -p <server_tcp_port> -t <duration>-cindicates the client mode.-h <server_host_ipaddr>specifies the IP address of a server to connect.-p <server_tcp_port>specifies the TCP port number of a server to connect.-t <duration>specifies the duration in seconds for which the program will send data. It should be a positive integer.
- Specification
- Argument check: Check the given port number is between 1 and 65535 (inclusive). Check the given duration is positive.
- Create a socket with
socketthenconnectto the server specified by command line arguments. (<server_host_ipaddr>and<server_tcp_port>) - Data should be sent in chunks of 1000bytes and the data should be all zeros.
- The program should close the connection and stop after the specified time (
<duration>) has passed. - When the connection is closed, the program should print out the elapsed time, the total number of bytes sent (in kilobytes), and the rate at which the program sent data (in Mbps) (1kilobyte=1000bytes, 1megabit = 1,000,000 bits = 125,000 bytes)
- Usage:
- Server mode: Wait for the client connection on the specified port. After the connection is established, receive TCP packets until the connection ends.
- Usage:
./iperfer -s -p <server_tcp_port>-sindicates the server mode.-p <server_tcp_port>specifies the TCP port number to which the server will bind.
- Specification
- Argument check: check the given port number is between 1 and 65535. (inclusive)
- Create socket with
socket. bindsocket to the given port (<server_tcp_port>) andlistenfor TCP connections.- Then wait for the client connection with
accept. - After the connection is established, received data in chunks of 1000bytes
- When the connection is closed, the program should print out the elapsed time, the total number of bytes received (in kilobytes), and the rate at which the program received data (in Mbps) (1kilobyte=1000bytes, 1megabit = 1,000,000 bits = 125,000 bytes)
- Usage:
Report your iperfer client results when running it for 10 seconds in the given two_hosts_direct topology.
- Two hosts, h1 and h2, are directly connected to each other in this topology.
- You can start a Kathara lab and connect to a virtual network device as in A0.
- In the terminal for each host, your binary is located in
/shareddirectory. This is a mirror of files located inlabs/two_hosts_direct/shareddirectory on the CloudLab node.
Notes
- Compile:
Makefileis included in the directory, so you can compile your code with$ makeand remove the compiled binary with$ make clean. The compiled binary will be located in thebinandlabs/<lab_name>/shareddirectories. - Test within a single host: We recommend you test your program prior to Kathara experiments. In this case, execute the client mode with
127.0.0.1as the<server_host_ip_addr>after executing server mode on the same node.127.0.0.1is the reserved IP address for the local host (loopback).
Part 2: Measurement on a Virtual Network
In this part of the assignment, you will use the tool you wrote (iperfer) and ping to measure a given virtual network’s end-to-end bandwidth and latency, respectively. We will use six_hosts_two_routers topology. The virtual network topology is formed as follows:
- There are 6 hosts,
h[1-6], and 2 routers,r[1-2]. h1,h2,h3are connected tor1, andh4,h5,h6are connected tor2.r1andr2are connected with a single link.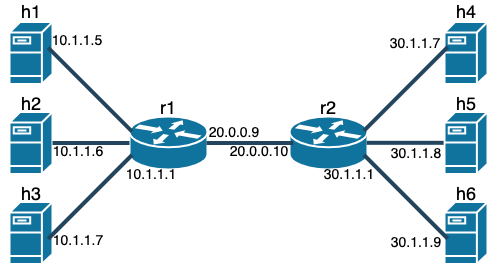
NOTE: To measure the average RTT (or latency), use $ ping -c [number_of_pings] [remote_ip_address].
For example, if you want to ping to h4 10 times, the command is $ ping -c 10 30.1.1.7.
NOTE: To measure the bandwidth (or throughput) between two hosts (say h1 and h4), execute iperfer as a client mode on one host then execute iperfer as a server mode on the other host.
NOTE: When you change Kathara startup files (e.g., r1.startup), you must stop the running Kathara lab with $ kathara lclean before every change.
Q1: Basic measurements
- Measure and report average RTT and throughput between two adjacent routers,
r1andr2. - Measure and report average RTT and throughput between two hosts,
h1andh4.
Q2: Impact of multiplexing on latency.
- Measure and report average RTT between two hosts,
h1andh4, while measuring bandwidth betweenh2andh5. - How does it compare to the measured latency in Q1 (RTT between
h1andh4)?
Q3: Impact of multiplexing on throughput
- Report the throughput between a pair of hosts varying the number of host pairs that conduct measurements.
- The host pairs are (
h1,h4), (h2,h5), (h3,h6). - e.g., First, measure throughput between (
h1,h4). Then measure throughput between (h1,h4) and throughput between (h2,h5) simultaneously. Finally, do the measurements on (h1,h4), (h2,h5), and (h3,h6) simultaneously.
- The host pairs are (
- How do the three measurements varying the number of concurrent host pairs compare to the measured throughput in Q1 (between
h1andh4)? - What’s the trend between measured throughput and the number of host pairs?
Q4: Impact of link capacity on end-to-end throughput and latency.
- Decrease link rate between
r1andr2to 1Mbps. This can be done by uncommenting line #5 in thelabs/six_hosts_two_routers/r1.startupandlabs/six_hosts_two_routers/r2.startupfiles. You have to clean up the previous Kathara lab before every change. Relaunch it after the changes. - Measure and report path latency (average RTT) and throughput between two hosts,
h1andh4.
- How does it change compared to Q1?
Q5: Impact of link latency on end-to-end throughput and latency.
- Comment out the lines that you uncommented for the previous question.
- For each case below, measure and report path latency (average RTT) and throughput between two hosts,
h1andh4.- Change the link delay between
r1andr2to 10ms by uncommenting line #6 of ther1.startupfile. - Change the link delay between
r1andr2to 100ms by uncommenting line #7 of ther1.startupfile. Comment out its line #6. - Change the link delay between
r1andr2to 1s by uncommenting line #8 of ther1.startupfile. Comment out its line #7.
- Change the link delay between
- What’s the trend between the measured throughput and latency?
Submission
You must submit:
- A tarball file of the modified assignment1 directory.
$ tar -zcvf assignment1 assign1_groupX.tar.gz- Replace
Xwith your group number.
- A pdf file contains the Part 1 results and the measurement results for Part 2.
- The PDF file must contain the names and EIDs of all group members.
Grading
iperfer.cimplementation- Command line argument verification: 5%
- Server mode implementation: 15%
- Client mode implementation: 15%
-
Part 1 results: 15%
- Part 2 results
- Q1: 10%
- Q2: 10%
- Q3: 10%
- Q4: 10%
- Q5: 10%
Appendix. Kathara Basics
A Kathara lab is a set of preconfigured (virtual) devices. It is basically a directory tree containing:
- lab.conf ⇒ describes the network topology and the devices to be started
- Syntax:
machine[arg]=value- machine is the name of the device
- if arg is a number ⇒ value is the name of a collision domain to which eth arg should be attached
- if arg is not a number, then it must be an option and value the argument
- Syntax:
- Subdirectories: contains the configuration settings for each device
<device_name>.startupfiles that describe actions performed by devices when they are started.
To deploy a virtual network, move to the Kathara lab directory then type $ kathara lstart. Then the XTerm terminal connected to each virtual network device would appear. To terminate the deployment, type $ kathara lclean. Some useful kathara commands are summarized here.