
Assignment 0: Cloudlab and Kathara
Released: 01/14/2025
Due: 01/23/2025
Overview
You will do your assignments for CS 356 using CloudLab and Kathara. CloudLab is a research facility that provides bare-metal access and control over a substantial set of computing, storage, and networking resources. If you haven’t worked in CloudLab before, you need to register a CloudLab account. Kathara is a network emulation tool that enables you to test your network programs without multiple physical servers and network devices. This small assignment walks you through the CloudLab registration process and shows you how to start an experiment in CloudLab. In addition, you will try out Kathara. You should submit a per-group report that shows you have successfully followed the process. Most importantly, it introduces our policies on using CloudLab that will be enforced throughout the semester.
NOTE: $ [shell_command] indicates to execute [shell_command] in your terminal.
Register a CloudLab Account
- Visit CloudLab and create an account using your UT Austin email address as an email.
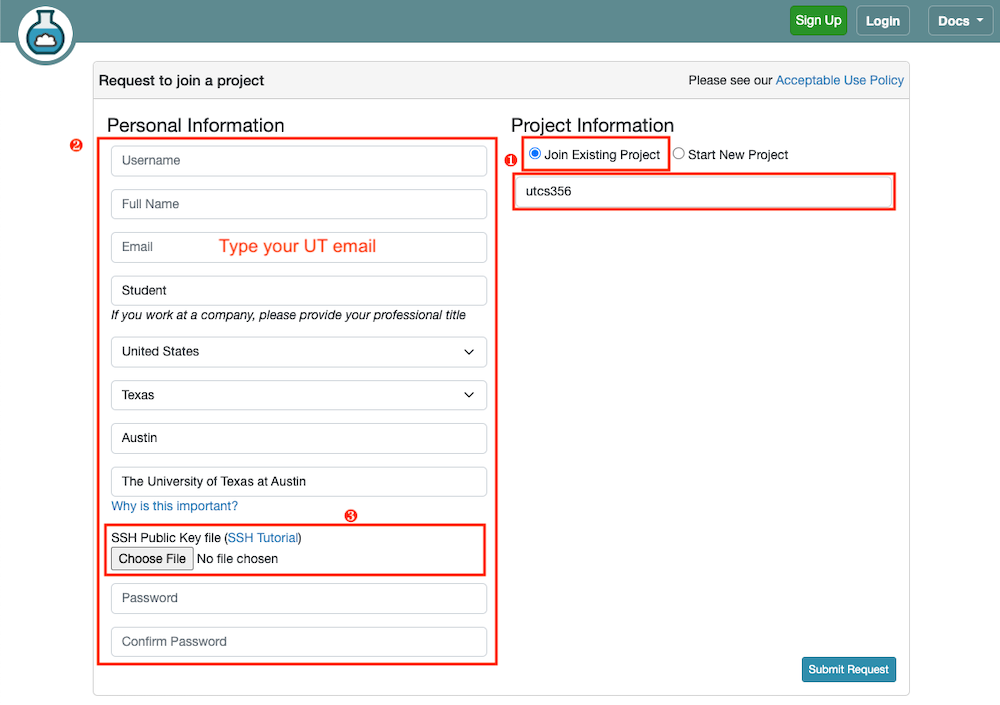
- Select
Join Existing Projectand enterutcs356. - Fill out your information. Use your UT email address as an email.
- Create ssh key pair and upload your public key during the account setup.
Ubuntu and macOS
- Install OpenSSH
macOS:$ brew install openssh
Ubuntu:$ sudo apt-get install openssh-client openssh-server - Generate a key pair with
ssh-keygen
You can use the below example as it is or try other cryptographic algorithms you prefer (see man ssh-keygen)
Example:$ ssh-keygen -t rsa -b 4096 - Type enter without typing any character when the prompt asks for the file path and passphrase.
- If you want to save your keys other than the default location, enter a file path (e.g.,
~/foo/mykey) to save your private key when the prompt asks for it. - If you want additional security, type a passphrase when the prompt asks for it.
- If you want to save your keys other than the default location, enter a file path (e.g.,
- The private key will be saved into the default location,
~/.ssh/id_rsa.~/.ssh/id_rsais your private key and~/.ssh/id_rsa.pubis your public key (upload this during the account registration).- If you specified a custom file path, your private and public keys will be located at the path you provided (e.g.,
~/foo/mykeyfor the private key and~/foo/mykey.pubfor the public key).
- If you specified a custom file path, your private and public keys will be located at the path you provided (e.g.,
Windows
- Check if
OpenSSH Clientis installed. (Windows 10 only)- Open the Windows 10 Start menu and search for
Apps & Features. In theApps & Featuresheading, clickOptional Features. - Scroll down the list to see if
OpenSSH Clientis listed. If not, click the plus sign next toAdd a feature, select OpenSSH Client, and clickInstall.
- Open the Windows 10 Start menu and search for
- Generate a ssh key pair.
- Press the Windows key or open up the Start Menu. Type
cmd. - Under
Best Match, clickCommand Prompt. - In the command prompt, generate a key pair with
ssh-keygenYou can use the below example as it is or try other cryptographic algorithms you prefer (see man ssh-keygen)
Example:$ ssh-keygen -t rsa -b 4096 - Type enter without typing any character when the prompt asks for the file path and passphrase. If you want to save your keys other than the default location, enter a file path to save your private key. If you want additional security, type a passphrase when the prompt asks for it.
- Open your file explorer. You can now navigate to the hidden
.sshdirectory in your home folder (C:\Users\[Username]). You should see two new files. The identification is saved in theid_rsafile and the public key is labeledid_rsa.pub. Upload the public key during the account registration.
- Press the Windows key or open up the Start Menu. Type
- Source: link
- Install OpenSSH
- Select
- If you already have an account, click your username at the top right corner and then select
Start/Join Projectand typeutcs356into the ProjectID field.
Once you complete the above steps, the instructor or TA will approve your request to join the project so that you can start an experiment.
Start an Experiment
An experiment in CloudLab means the instantiation of a profile. You can think of a profile as a pre-configured VM image that includes OS and necessary setup. An experiment lasts only for the reserved hours, and all the changes you made on top of the profile will be discarded. Make sure that you use a private git repository to save your code.
- To start a new experiment, go to your CloudLab dashboard and click the
Experimentstab in the upper left corner. Then selectStart Experiment, moving to the profile selection panel.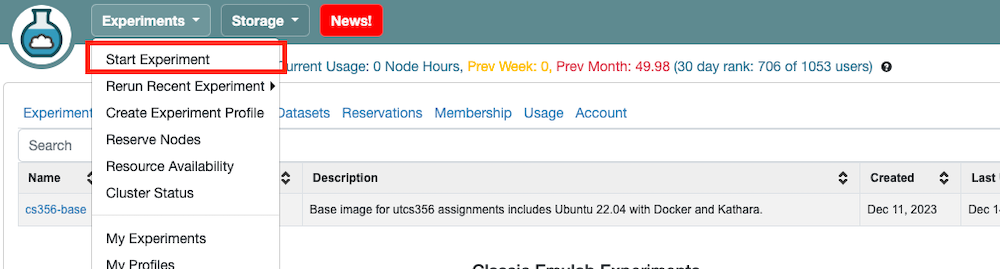
- Click
Change Profile.
- Select a profile from the list. Choose the
cs356-baseprofile in theutcs356project. With this profile, you can launch one machine with the Ubuntu 22.04.2 LTS image with Docker and Kathara additionally installed.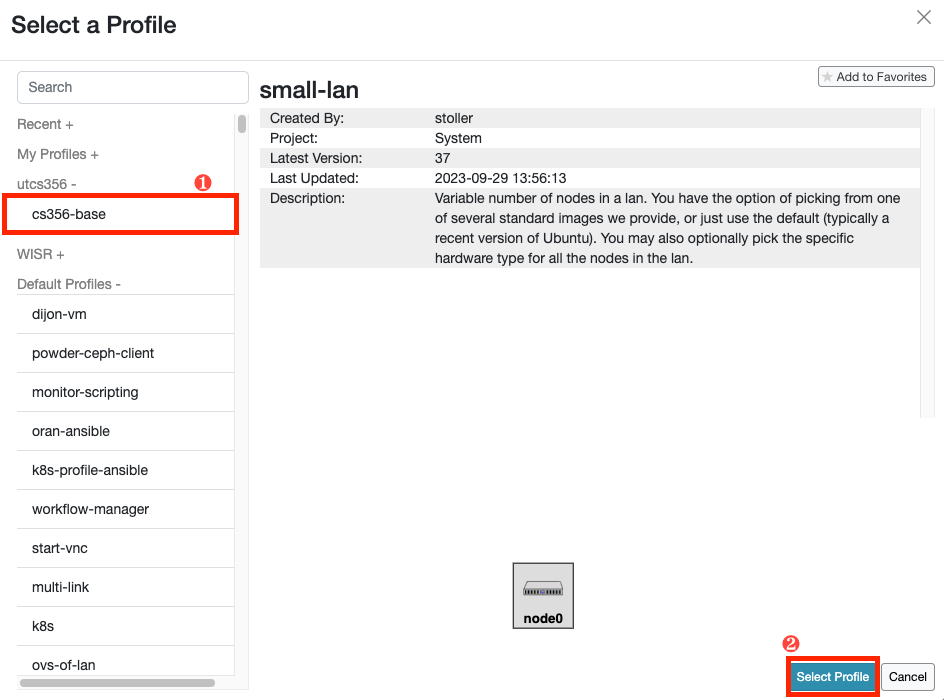
- Click
Nextto move to the next panel (Parameterize).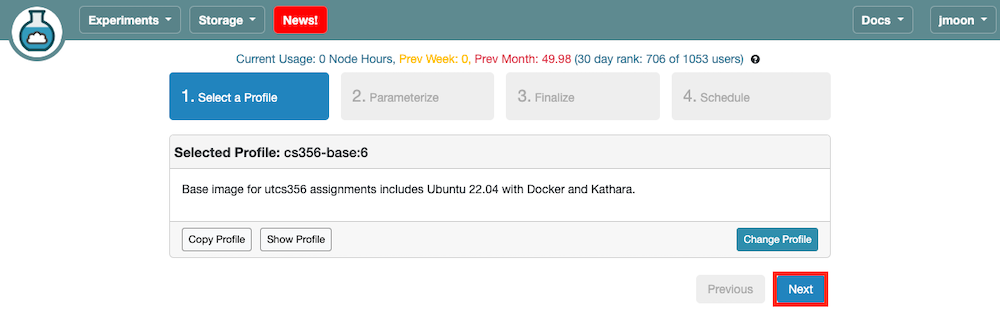
- Click
Nextto move to the next panel (Finalize). You don’t need to parameterize an experiment unless explicitly mentioned.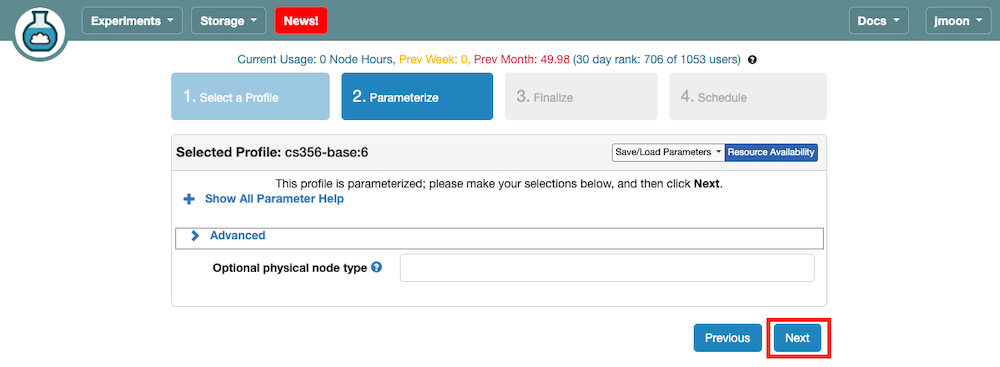
- Here, you should name your experiment with
CSLogin1-CSLogin2(CSLogin1is the cs username of Member 1), selectutcs356asProject, and your assignment group asGroup(You will be invited. If you’re not yet invited,Groupmight not appear. You’re ok to proceed without selectingGroupfor this assignment). You need to specify from which cluster you want to start your experiment. Please select the Wisconsin cluster. If it fails, then try another cluster except for the Utah cluster. ClickNextto move to the next panel (Schedule).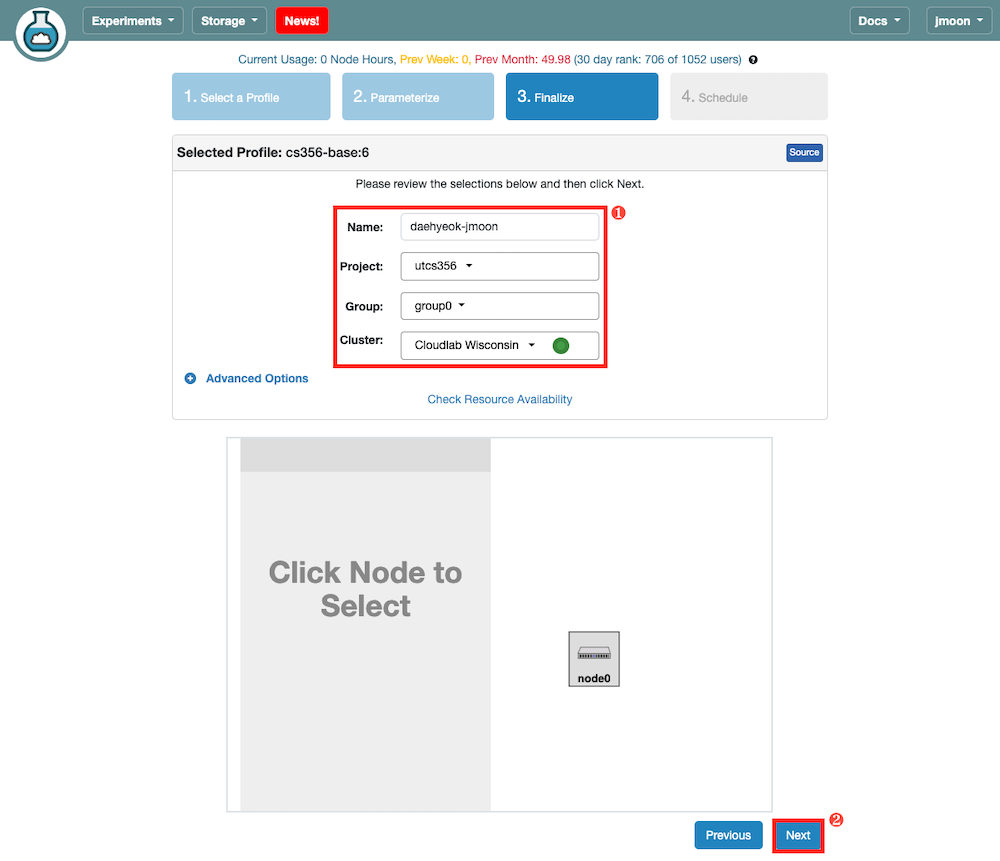
- Enter the desired experiment duration and the time/date when you want to start the experiment. If you want to start your experiment as soon as possible, skip the
Start on date/timefield. Once your experiment is ready you will receive a notification email.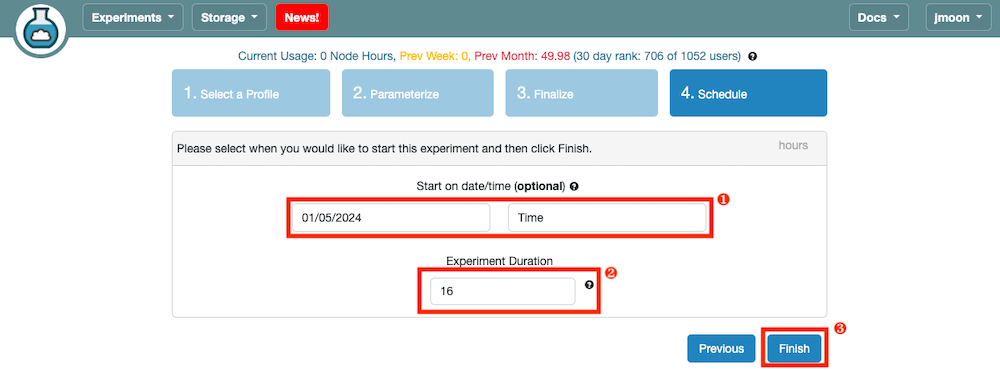
-
You can navigate to your CloudLab user dashboard to see your list of active experiments. You will move to a webpage describing project details by clicking on the experiment name.
 Click the
 List Viewon that page, which opens a table where you can obtain the SSH login command (ssh <cloudlab_id>@<cloudlab_host>) to log in to your machine. Ensure that the status of your experiment is “Ready” before attempting to access it via SSH. It may take approximately 10 minutes for the experiment to reach the ready state.
- Try to login to the machine by executing the provided SSH command in your terminal. This step will only work if you have uploaded your SSH public key to your CloudLab account. Add your public key if you did not add it during the registration (here).
$ ssh <cloudlab_id>@<cloudlab_host>- If you specified a custom file path while creating your SSH key pair, try:
$ ssh -i <private_key_path> <cloudlab_id>@<cloudlab_host>. - You may want to setup remote development on VSCode. Make sure the above ssh command works before VSCode setup.
VSCode setup
- Install the Remote-SSH extension.
- In VS Code, select
Remote-SSH: Connect to Host...from the Command Palette (F1) and use the same<cloudlab_id>@<cloudlab_host>as in the above ssh command. - If VS Code cannot automatically detect the type of server you are connecting to, you will be asked to select the type manually. Select
Linux. - You can then open any folder or workspace on the remote machine using
File > Open...orFile > Open Workspace...just as you would locally!
Refer to the link for more detailed instructions.
If you find yourself stuck on any of the above steps, don’t hesitate to post your questions to Ed!
Tasks
Part 1: Check for the Available Resources
Check the number of physical CPU cores, logical cores (threads), and available memory on the node you reserved using the following commands:
- CPU information:
$ lshw -class cpuor$ lscpu - Memory information:
$ free -h
Include the resource details from these commands in your report.
Part 2: Create a virtual network with Kathará
Throughout the assignments, we will use Kathará, an open-source container-based network emulation system. With the network emulation tools like Kathará, we can test (network) applications without multiple servers and network devices. In Kathara, you can create a virtual network consisting of multiple virtual network devices by launching a Kathara lab. A Kathara lab directory in which you launch the lab defines a virtual network to be created.
- Setup
After ssh to the reserved node, type the command below.
$ sudo usermod -aG docker $USER
Then restart the SSH session to make sure the changes are applied.
- Launch a Kathara lab to create a virtual network
Run the below commands. The below will launch a virtual network defined in the Kathara lab directory, assignment1/labs/two_hosts_direct/.
$ git clone https://github.com/utcs356/assignment1.git
$ cd assignment1/labs/two_hosts_direct
$ kathara lstart
If you encounter any warnings or errors related to xterm when executing the above commands, please disregard them.
- Connect to the virtual network devices generated by Kathara
There are two virtual network devices in this Kathara lab, h1 and h2. Create two separate terminals with tmux. tmux allows you to create multiple terminals without multiple SSH connections. Expand the below for its usage.
tmux usage
- A brief introduction to
tmux
Withtmux, you can create multiple windows (full-sized terminals) and divide them into panes (splitted terminals) on a single SSH connection. Start a new tmux session on a SSH terminal, by typing$ tmux. To execute the tmux command such as creating and splitting a window, you should first type the trigger key (Ctrl+bby default) to change the cursor from a terminal to thetmuxcommand bar. You can split the window vertically withCtrl+b %and horizontally withCtrl+b ". You can move cursors from a pane to adjacent panes by usingCtrl+b <arrow_key>. You can create a window withCtrl+b c, move to the next window withCtrl+b n, and go back to the previous window withCtrl+b p. - Make as many panes/windows as you want, then connect to the Kathara node on each pane/window.
- Refer to here for more details on how to use
tmux.
In each terminal, connect to each device with $ kathara connect <device_name> (e.g., $ kathara connect h1). Make sure you launch the command in the lab directory.
- Check the virtual network devices
Run $ ifconfig (man ifconfig) to identify the network interfaces and their IP addresses on each device (terminal).
Report the IP address of the network interface attached to each device in your report. Please include a screenshot showing the outputs of ifconfig from both devices displayed within a single tmux window.
- Clean up the Kathara lab
Don’t forget to run $ kathara lclean in the lab directory when you’re done with your lab.
NOTE: You should follow these steps to run a Kathará lab throughout the assignments.
Deliverable
For each group, submit a report in a pdf file named assign0_groupX.pdf, where X is your group number. Make sure to include your group number, names, and EIDs in the report.
Policies on Using CloudLab Resources
- Please read and follow Cloudlab’s Acceptable Use Policy.
- CloudLab gives users 16 hours to start with, and users can extend it longer. You can manage your time efficiently and only hold onto those nodes when working on the assignment.
- You should use a private git repository to manage your code and terminate the nodes when you are not using them. If you do need to extend the nodes, do not extend them by more than one day. We will terminate any cluster running for more than 48 hours.
- As a member of the
utcs356project, you have permission to create new experiments in the default group in addition to the group you are invited to. Stick to your own group and use naming formats as mentioned. For more information related to this, please refer to this. - Each cluster has different hardware. For more information on CloudLab’s hardware, please refer to this.