
Assignment 2: Software Switch and Router with P4
Released: 02/14/2024
Due: 03/05/2024
- Part 0: Setup
- Part 1: Switching with P4
- Part 2: Router with P4
- Submission
- Appendix: Table Insertion API for
controller.py
Part 0: Setup
Unlike the previous assignments, we will use the cs356-p4 profile instead of cs356-base in this assignment.
It includes a Kathara image with P4 utilities to run your P4 code on a virtual device.
To get a skeleton code, clone the git repository and make your own private repository as in A1. (refer to A1 setup)
The task is implementing a basic switch and router with P4 (data plane) and Python (control plane).
Tip: Using tmux to access Kathara nodes
After you launch the Kathara lab with $ kathara lstart, you can connect to each Kathara node from any terminal you want by using $ kathara connect <host_name>. For example, if you want to open a terminal for s1 in the star_four_hosts Kathara lab, execute $ kathara connect s1. Note that the command only works in the Kathara lab directory.
However, opening multiple SSH terminals to connect to different Kathara nodes is cumbersome, and there’s a tool called tmux to rescue it. With tmux, you can create multiple windows (full-sized terminals) and divide them into panes (splitted terminals) on a single SSH connection. Start a new tmux session on a SSH terminal, by typing $ tmux. To execute the tmux command such as creating and splitting a window, you should first type the trigger key (Ctrl+b by default) to change the cursor from a terminal to the tmux command bar. You can split the window vertically with Ctrl+b % and horizontally with Ctrl+b ". You can move cursors from a pane to adjacent panes by using Ctrl+b <arrow_key>. Make panes/windows as many as you want, then connect to the Kathara node on each pane/window by using $ kathara connect <host_name>.
Refer to here for more details on how to use tmux.
Notes
- Experiment instantiation
- Make sure to use profile
cs356-p4, notcs356-base. - Make sure to specify your group during instantiation. If you cannot see the Group options yet, please contact TA through Ed or email.
- You should SSH to the node using XTerm for Part 1 and Part 2 tests.
- Make sure to use profile
- For every experiment instantiation, you should
$ sudo usermod -aG docker $USER
$ touch ~/.Xauthority
Then, restart the SSH session to make sure the changes are applied.- Clone your private repository and push the changes you made.
Part 1: Switching with P4
Overview
In this part of the assignment, you will implement a software switch with P4. Kathara lab for this part is located in assignment2/labs/star_four_hosts. The skeleton codes are located in the assignment2/labs/star_four_hosts/shared. The virtual network topology is illustrated below.
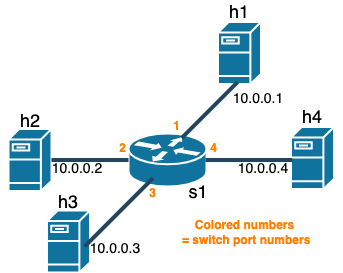
Your task is to complete l2_basic_forwarding.p4 and controller.py to make the switch s1 work so that h[1-4] can talk to each other.
Specification
- Parse the ethernet header.
- The parser is already implemented, and your job is to define an ethernet header format,
header ethernet_t.
- The parser is already implemented, and your job is to define an ethernet header format,
- Implement forwarding.
- P4 task: Complete the definition of
table dmac_forward
- Check whether the destination MAC address has a MAC-to_port_mapping
- Upon hit, forward the packet to the retrieved port using
action forward_to_port(). - Upon miss, broadcast the packet using
action broadcast().
- P4 task: Complete the definition of
- Implement MAC learning. MAC-to-port mapping should expire after 15 seconds from the last packet arrival from the interface.
- P4 task: Complete the definition of
table smac_table.
- Check whether the source MAC address of the packet has a MAC-to-port mapping.
- Upon hit, do nothing.
- Upon miss, send the MAC-to-port mapping to the controller.
- Define
struct mac_learn_digest_t. - Complete the
action learn().
- Define
- Controller task: Install table entries for the tables when a digest message arrives. Set the timeout for the entries. Table entry insertion API is provided, and please refer to the Appendix for the details.
smac_table: Install a table entry with the MAC address as a key.NoAction()as an action.dmac_forward: Install a table entry with the MAC address as a key,forward_to_port()as an action, andegress_portas an action parameter.
- P4 task: Complete the definition of
Test your implementation.
- Compile the P4 code and launch the P4 and controller program on the switch (
s1).- All the necessary commands are provided as script files in the Kathara lab’s
shareddirectory. - After starting the Kathara lab, compile the P4 code with
$ bash compile_p4.shons1after$ cd /shared. - Then launch the compiled P4 program with
$ bash run_switch.shand the controller with$ bash run_controller.shon each router. They are all located in theshareddirectory.
- All the necessary commands are provided as script files in the Kathara lab’s
- Test the functionality.
- You may use
pingto check whether your switch works as expected on a host (h[1-4]). - Once you implement forwarding, the packet should arrive at each host in the local network except the sender for every ping.
- Once you implement MAC learning, the packet should arrive at each host in the local network except the sender until the table insertion is done. Then, the packet must arrive only at the destination host until the table entry expires. In other words, if the broadcasting behavior disappears after some time, you have implemented MAC learning properly.
- To check if the packet arrives at a host, use
tcpdump -i <interface>to sniff the packet on the host’s interface. The interface name can be retrieved by usingifconfig. For more details, refer to man tcpdump. Usetcpdump -i anyto sniff packets from all interfaces. - If you started the assignment before Feb 28 and the controller crashes with the error message that the table entry already exists, please apply this patch to your repository.
- You may use
Part 2: Router with P4
Overview
In this part of the assignment, you will implement a static software router with P4. Since it’s static, it routes a packet based on a given routing information. Kathara lab for this part is located in assignment2/labs/three_routers_three_hosts. The skeleton codes are located in the assignment2/labs/three_routers_three_hosts/shared. The virtual network topology is illustrated below.
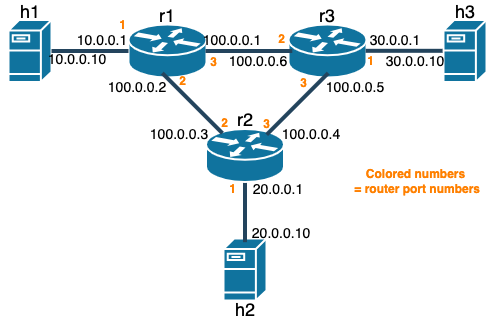
Your task is to complete l3_static_routing.p4 and controller.py to make the routers r[1-3] work so that hosts in different local networks can talk to each other.
Specification
- Parse the ethernet and IPv4 header.
- Define a ethernet header format,
header ethernet_t, and an IPv4 header format,header ipv4_t - Complete the
state parse_ethernetinMyParser(). Check the ethernet frame type, and go to the parse_ipv4 state if the frame type is IPv4. Otherwise, accept the packet.
- Define a ethernet header format,
- Implement a routing table
- P4 task: Define tables and actions.
- Complete the definition of
table ipv4_route.- Perform the longest prefix matching on dstIP.
- Upon hit, record the next hop IP address (provided by the controller) in the
metadata meta’snext_hopfield usingaction forward_to_next_hop. - Upon miss, drop the packet.
- Complete the definition of
table arp_table.- Perform exact matching on the
next_hopin themetadata meta. - Upon hit, change the dstMAC (provided by the controller) using
action change_dst_mac. - Upon miss, drop the packet.
- Perform exact matching on the
- Complete the definition of
table dmac_forward.- Perform an exact match on the destination MAC address of the packet.
- Upon hit, change the egress port. (provided by the controller). Update the source MAC address to the egress port’s MAC address. (provided by the controller). Do this by completing and using
action forward_to_port. - Upon miss, drop the packet.
- Apply the tables in the
applyblock.
- Complete the definition of
- Controller task: Install table entries.
Parsing of routing information is provided in the skeleton code. Your task is to install the table entries for each table defined in the P4 code. Table entry insertion API is provided, and please refer to the Appendix for the details.ipv4_route: Install table entries with the destination IP address as a key,forward_to_next_hopas an action, andnext_hop_ipas an action parameter.arp_table: Install table entries with thenext_hopin the metadata as a key,change_macas an action, andnext_hop_macas an action parameter.dmac_forward: Install table entries with the MAC address as a key,forward_to_port()as an action, andegress_portandegress_macas action parameters.
- P4 task: Define tables and actions.
- Checksum and TTL
- Decrement the TTL field of the IPv4 header by 1. Complete the definition of
action decrement_ttl()and call the action in theapplyblock inMyIngress(). - Complete
MyVerifyChecksum()andMyUpdateChecksum(). Useextern verify_checksum()andextern update_checksum. They are defined in this link. Below are the definitions.extern void verify_checksum<T, O>(in bool condition, in T data, in O checksum, HashAlgorithm algo);extern void update_checksum<T, O>(in bool condition, in T data, inout O checksum, HashAlgorithm algo);- If the
conditionis false, the operation is not applied. (They don’t indicate a checksum error and change the checksum value.) datais a tuple of values whose checksum is computed. The types of the values should be bit, int , or varbit . checksumis the checksum ofdatathat will be verified or updated.- Use
HashAlgorithm.csum16asalgo - You don’t have to specify
TandOexplicitly. - Usage example:
  /* Checksum will be calculated over all header fields but csum */
  /* as in the IP header checksum computation */
  header myproto_t {
      bit<4> ver;
      bit<4> hlen;
      bit<8> flags;
      bit<16> id;
      bit<16> len;
      bit<16> csum;
      bit<32> srcAddr;
      bit<32> dstAddr;
  }
  struct headers {
      myproto_t myproto;
  }
  ...
  control MyVerifyChecksum(inout headers hdr, inout metadata meta) {
      apply {
          verify_checksum(true,
              /* A tuple is enclosed in curly brackets*/
              { hdr.myproto.ver,
                  hdr.myproto.hlen,
                  hdr.myproto.flags,
                  hdr.myproto.id,
                  hdr.myproto.len,
                  hdr.myproto.srcAddr,
                  hdr.myproto.dstAddr
              },
              hdr.myproto.csum,
              HashAlgorithm.csum16);
      }
  }
  ...
  control MyComputeChecksum(inout headers hdr, inout metadata meta) {
      apply {
          update_checksum(true,
              /* A tuple is enclosed in curly brackets*/
              { hdr.myproto.ver,
                  hdr.myproto.hlen,
                  hdr.myproto.flags,
                  hdr.myproto.id,
                  hdr.myproto.len,
                  hdr.myproto.srcAddr,
                  hdr.myproto.dstAddr
              },
              hdr.myproto.csum,
              HashAlgorithm.csum16);
      }
  }
- If the
- Decrement the TTL field of the IPv4 header by 1. Complete the definition of
Test your implementation.
- Compile the P4 code and launch the P4 and controller program on the routers (
r[1-3]).- All the necessary commands are provided as script files in the Kathara lab’s
shareddirectory. - After starting the Kathara lab, compile the P4 code with
$ bash compile_p4.shonr[1-3]after$ cd /shared. - Then launch the compiled P4 program with
$ bash run_switch.shand the controller with$ bash r[1-3]_run_controller.shon each router.
- All the necessary commands are provided as script files in the Kathara lab’s
- Test the functionality.
- You may use
pingto check whether your router works as expected on a host (h[1-3]). - To check if the packet arrives at a host, use
$ tcpdump -i <interface>to sniff the packet on the host’s interface. The interface name can be retrieved by usingifconfig. For more details, refer to man tcpdump. Usetcpdump -i anyto sniff packets from all interfaces. - To verify IPv4 checksum and check the TTL field, add the
-vflag to thetcpdumpcommand.
- You may use
Submission
Please submit your code (modified assignment2 repository) to the Canvas Assignments page in either tar.gz or zip format.
The naming format for the file is assign2_groupX.[tar.gz/zip].
Appendix: Table Insertion API for controller.py
- Create a table entry you want to insert.
In the skeleton code, the instance of thehelperclass,p4info_helper, is already created and initialized. Its role is to interpret the human-readable format of P4 objects in the way that the P4 program understands. To build a table entry in a way that the P4 program understands, you can use thehelperclass’sbuildTableEntry()method. Its API is described below.def buildTableEntry(self, table_name, # human-readable table name in string match_fields=None, # a dictionary with a human-readable match field as a key and its value as a value default_action=False, # human-readable default action name in string (This is not necessary if you already define the default_action in the P4 code) action_name=None, # human-readable action name in a string (This action is executed upon hit) action_params=None, # a dictionary with a human-readable action parameter name as a key and its value as a value priority=None # unused in our case ):For the value for the
match_fieldsandaction_paramsdictionaries, here’s a guideline to the format of the value:- IP address: String in the dotted decimal notation (e.g.,
10.0.0.1) - IP prefix for longest prefix matching: a tuple with IP prefix in string and prefix length in integer. (e.g.,
(10.0.0.0, 24)which means the table key is in the range10.0.0.[1-255]) - MAC address: String in the
xx:xx:xx:xx:xx:xxformat (e.g.,00:00:0a:00:00:01) - Port number: Integer
To set a timeout, you should change the attribute,
idle_timeout_ns, of the table entry as below in integer and the unit of nanoseconds.table_entry.idle_timeout_ns = int(1 * 1e9) # timeout is 1 secondFor more details, you can refer to the file,assignment2/labs/star_four_hosts/shared/utils/p4runtime_lib/helper.py.
- IP address: String in the dotted decimal notation (e.g.,
- Send a table entry to the switch.
TheBmv2SwitchConnectionobject,s1, is provided and initialized. The object is the abstraction of a connection between the switch and the controller. To add a table entry you built in the above step, you can simply call theWriteTableEntrymethod of theBmv2SwitchConnectoinobject withtable_entryas a parameter. (e.g.,s1.WriteTableEntry(table_entry))
Usage example
Say there’s a l2_simple_switch.p4 and it defines a table in the ingress control block as below.
...
control MyIngress() {
    table dmac_forward {
        key = {
            hdr.ethernet.dstAddr: exact;
        }
        actions = {
            forward_to_port;
            drop;
        }
        size = 4;
        default_action = drop;
    }
    ...
}
When you compile this program, the compiler will create l2_simple_switch.p4info.txt. The P4info file contains a human-readable name to an instance id (integer) mapping. You can retrieve the arguments for the buildTableEntry method from here. Below is the example code snippet from the controller code used in the in-class demo.
mac_to_port = {"00:00:0a:00:00:01":1,
            "00:00:0a:00:00:02":2,
            "00:00:0a:00:00:03":3,
            "00:00:0a:00:00:04":4}
for eth_src_addr, port_id in mac_to_port.items():
    table_entry = p4info_helper.buildTableEntry(
        table_name="MyIngress.dmac_forward",
        match_fields={"hdr.ethernet.dstAddr": eth_src_addr},
        action_name="MyIngress.forward_to_port",
        action_params={"egress_port": port_id}
    )
    s1.WriteTableEntry(table_entry)