
Assignment 3: Reliable Transport Protocol and Congestion Control
Released: 02/12/2026
Due: 03/10/2026
Overview
In this assignment, you will implement the transport layer of a network stack. Your implementation must ensure reliable packet transmission, even in the presence of packet corruption and loss. To achieve efficient communication, you will also implement sliding window, flow control, and congestion control mechanisms.
We strongly recommend starting the assignment early.
Environment Setup
We recommend using the cs356-base profile on CloudLab for implementation and testing.
- Obtain the Skeleton Code
- For this assignment, the assignment repo is in private. Please access our repo using the following method:
- Download our ssh private key from
Canvas > Assignments > Assignment3description - Add the private key to your SSH agent:
ssh-add <PRIVATE KEY PATH> - Clone the assignment repository:
git clone git@github.com:utcs356/assignment3.git
- Download our ssh private key from
- Install Dependencies
- Run the following command to install required dependencies. We recommend using CloudLab machines for development:
> sudo bash setup/setup.sh
Implementation
The objective of this assignment is to implement a transport-layer protocol called UT-TCP, which supports reliable and efficient communication.
As the name suggests, many concepts are adopted from the existing TCP implementation, but UT-TCP is a simplified version.
We provide skeleton code that includes a UT-TCP socket and its corresponding APIs in ut_tcp.h:
Provided APIs
ut_socket(): Creates a new UT-TCP socket, which maintains information such as the address, send/receive buffers, sliding window, and congestion control.- When a socket is created, a dedicated thread binds to it, handling data transmission and reception via the
begin_backend()function.
- When a socket is created, a dedicated thread binds to it, handling data transmission and reception via the
ut_close(): Closes the socket.ut_read(): Reads data from the receive buffer.ut_write(): Writes data to the send buffer.
Usage Example
You can find examples of how to create sockets and use these APIs in server.c and client.c.
A simplified version is shown below:
ut_socket_t socket;
ut_socket(&socket, TCP_LISTENER, portno, serverip); // Creates a socket
ut_write(sock, "Who's there?", 12); // Sends 12 bytes of data
int n = ut_read(sock, buf, 12, NO_FLAG); // Reads data from the receive buffer
printf("Received: %.*s\n", n, buf);
ut_close(&socket) // Closes the socket
Your goal is to enable reliable communication by implementing the required functions in backend.c.
Carefully read the following descriptions and complete the TODO sections specified in the skeleton code.
You may modify the skeleton code outside the TODO sections, but do not change the function signatures of the UT-TCP socket and its APIs.
Part 1: Connection Establishment and Termination
To enable reliable communication between two entities (INITIATOR and LISTENER), the connection must first be established.
You will implement the TCP three-way handshake before data transmission begins.
Additionally, you will handle connection teardown to safely terminate the connection when no more data needs to be transmitted.
Three-Way Handshake
The connection establishment follows this workflow:
- Client (
INITIATOR) → Server (LISTENER): SYN- The client sends a SYN packet to initiate the connection, and the server receives it.
- The skeleton code provides an example of sending SYN packets in
send_pkts_handshake(). - The
sock->send_synflag determines whether a SYN packet should be sent (or a SYN+ACK packet for the server). - Upon receiving the SYN, the server initializes the receive window (
sock->recv_win), updating its attributes based on the sequence number.
- Server (
LISTENER) → Client (INITIATOR): SYN+ACK- The server responds with a SYN+ACK packet.
- The client receives the SYN+ACK and updates its send and receive windows based on the sequence and acknowledgment numbers.
- Client (
INITIATOR) → Server (LISTENER): ACK- The client sends an ACK to acknowledge the connection.
- The server receives the ACK and updates its send window accordingly.
- At this point, both the client and server have successfully completed the initialization phase.
Connection Teardown
When a socket has finished transmitting data, it calls ut_close() to terminate communication.
Your task is to handle receiving FIN packets and sending the corresponding ACK packets as part of the termination process.
Either the server or client can initiate termination by sending a FIN packet when ready.
The expected behavior is as follows:
- When there is no more data to send, the socket sets the sequence number for the
FINpacket (seecheck_dying()). - The initiating entity (server or client) sends a
FINpacket (see the firstifstatement inbegin_backend()).- Even after sending
FIN, the socket must still be able to receive packets.
- Even after sending
- Upon receiving a
FINpacket, the other entity responds with anACK. - An entity can safely terminate its thread after a timeout if both of the following conditions are met (see
begin_backend()):- It has received an ACK for its
FINpacket. - It has received a FIN from the other entity.
- It has received an ACK for its
Note: Simultaneous termination (where both the server and client send FIN & ACK in the same packet) is not considered in this assignment.
You do not need to handle this scenario.
Implementation Details
In this part, you will implement the following functions in backend.c to establish connections:
send_pkts_handshake()handle_pkt()(handleFINpackets in this function)handle_pkt_handshake()
Part 2: Sliding Window and Flow Control
After completing the three-way handshake, the server and client are ready to send and receive data. To achieve efficient data transmission, you will implement sliding window and flow control mechanisms.
A sliding window allows the sender to transmit multiple packets before waiting for an acknowledgment (ACK). We recommend reading Chapter 5.2 in the P&D textbook for a deeper understanding of these concepts.
Sliding Window at the Sender (sock->send_win)
On the sending side, three pointers are maintained within the send buffer:
last_ack: The last byte acknowledged by the receiver.- When a new ACK is received, update
last_ackas:last_ack = new ACK - 1
- When a new ACK is received, update
last_sent: The last byte sent by the socket.- Update
last_sentwhen:- Sending new packets.
- Retransmitting data starting from
last_ack.
- Update
last_write: The last byte written by the client or server usingut_write().
              [send_win]
    ┌────────────────┬─────────────┐
    │                │             │
    └────────────────┴─────────────┘
    ^                ^             ^
last_ack         last_sent     last_write

* last_ack <= last_sent
* last_sent <= last_write
Sliding Window at the Receiver (sock->recv_win)
On the receiving side, three sequence number pointers are maintained:
last_read: The last byte read by the client or server usingut_read().next_expect: The next expected sequence number.last_recv: The last byte received.- There may be missing bytes between
next_expectandlast_recvif packets arrive out of order. - The receive buffer should not grow larger than
MAX_NETWORK_BUFFER.
- There may be missing bytes between
              [recv_win]
    ┌────────────────┬────░░░░░────┐
    │                │    ░░░░░    │
    └────────────────┴────░░░░░────┘
    ^                ^  <missing>  ^
last_read        next_expect   last_recv

* last_read < next_expect
* next_expect <= last_recv + 1
Flow Control and Advertised Window
- The receiver’s advertised window determines the maximum amount of data the sender can transmit.
- The UT-TCP header includes the
advertised_windowfield to communicate this value.- The advertised window is calculated as:
advertised_window = MAX_NETWORK_BUFFER - (last_recv - last_read)
- The advertised window is calculated as:
- The sender updates the advertised window (
sock->send_adv_win) as it processes incoming data.- Make sure to handle the case when the advertised window is 0 by continuously probing with one data byte.
- Currently,
send_empty()in the skeleton code prevents the advertised window from reaching zero by setting the lower bound to MSS. This behavior can lead to inefficient data transmission when the receiver’s buffer is full.
- The UT-TCP header includes the
Implementation Details
In backend.c, you will implement the following functions to support sliding window and flow control:
send_pkts_data()handle_pkt()updated_received_buf()
Part 3: Congestion Control
In this part, you will implement congestion control based on the TCP Reno algorithm.
Your implementation must control the congestion window (sock->cong_win) and the slow start threshold (sock->slow_start_thresh).
When implementing congestion control:
- The sending window size should be the minimum of:
- The congestion window (
cong_win) - The advertised window (
advertised_window) determined by flow control
- The congestion window (
- Ensure that the total buffered data remains below
MAX_NETWORK_BUFFER
TCP Reno Congestion Control
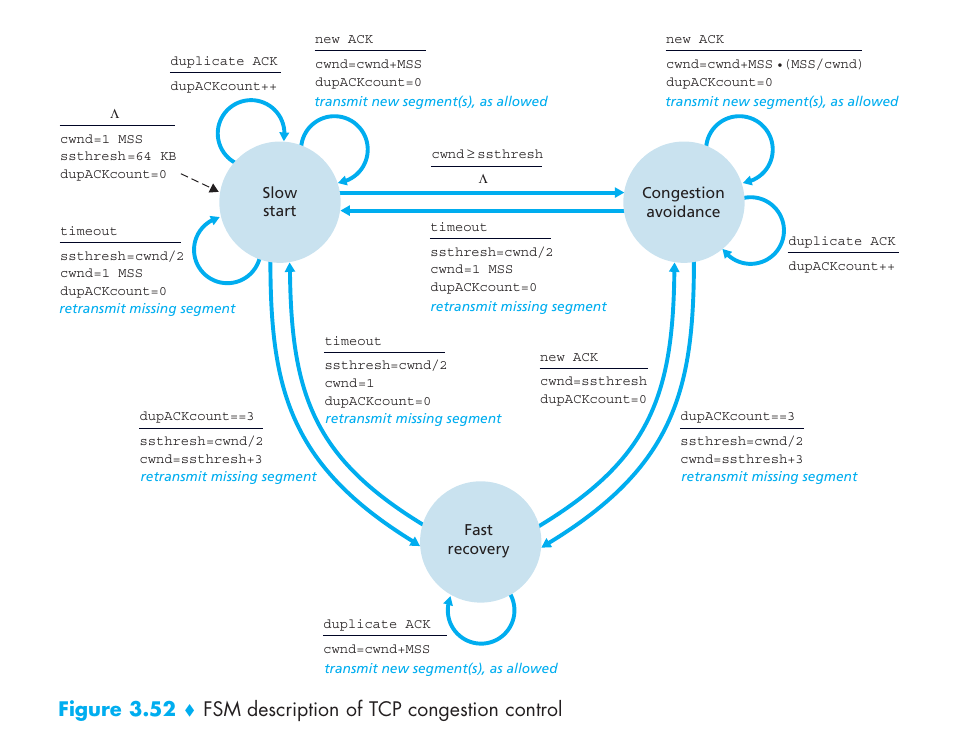
The figure above shows the full TCP Reno congestion control state diagram. (Extracted from Computer Networking: A Top-Down Approach (7th Edition) by Kurose and Ross.)
States and Transitions
- Slow Start
- The congestion window (
cong_win) increases byMSSfor each new ACK (Additive Increase). - Transition to Congestion Avoidance when
cong_win > slow_start_thresh.
- The congestion window (
- Congestion Avoidance
- The congestion window is adjusted as:
new congestion window=current congestion window+MSS* (MSS/current congestion window)
- The congestion window is adjusted as:
- Fast Recovery (Triggered by three duplicate ACKs)
- Upon receiving three duplicate ACKs, retransmit the lost segment immediately.
- Transition from Slow Start to Fast Recovery.
- While duplicate ACKs continue:
- Transmit new segments
- Increase
cong_winbyMSSfor each duplicate ACK
- Upon receiving a new ACK, transition to Congestion Avoidance.
- Timeout Handling
- Upon a timeout, the sender returns to Slow Start.
- The slow start threshold is halved, and
cong_winis reset toMSS. - For grading consistency, this assignment uses a static timeout instead of adaptive timeout techniques (e.g., Karn/Partridge algorithm).
Implementation Details
In backend.c, you will implement or modify the following functions to support congestion control.
The TODO items in the skeleton code will guide you through this process.
To help you implement the TCP Reno state transitions, we provide an example of handling duplicate ACKs in the handle_ack() function.
Functions to modify:
handle_ack()handle_pkt()recv_pkts()send_pkts_data()
Testing Your Implementation
We describe tools for developing and testing your implementation.
Simple Server and Client
We provide example implementations of the server and client that use UT-TCP sockets.
For more details, please refer to server.c and client.c.
To execute the programs, run the following commands. This example assumes the server and client are running in local environments. Feel free to modify the address and port in the environment variables as needed.
# Compile your UT-TCP implementation along with server and client programs
make clean && make
# A terminal for server
dd if=/dev/urandom of=tests/random.input bs=1K count=10
UT_TCP_ADDR=127.0.0.1 UT_TCP_PORT=8000 UT_TCP_FILE_SIZE=10240 ./server
# Another terminal for client
UT_TCP_ADDR=127.0.0.1 UT_TCP_PORT=8000 UT_TCP_FILE_SIZE=10240 ./client
We expect the server and the client to finish communications successfully after a few seconds. You can check the correctness of data transmission using the following command. We expect no output to appear; the command will print messages when the files are different.
cmp -l tests/random.input tests/random.output
To test with different file sizes, you can create random files with the following command and replace tests/random.input:
# Creates a file with 100 blocks of 1KB each (a 100KB file)
dd if=/dev/urandom of=tests/random.input bs=1K count=100
# Check file size in bytes
stat --format=%s tests/random.input
For grading, we will limit our test cases to file sizes up to 50MB.
Be sure to update the UT_TCP_FILE_SIZE environment variable accordingly whenever you change the test file.
Python Unit Test
We provide testing tools based on Python’s unittest framework to manipulate packets and verify the behavior of your server and client implementations.
Please note that passing all the provided Python tests does not guarantee a full score; additional grading test cases will not be shared.
- To run all Python tests, use:
make clean && make
make test
Test results will be written to results.json.
- To run a specific test case, use:
# From the root directory of the assignment
cd support/execs && SUBMISSION_DIR=../.. make all && cd ../../tests
python3 -m pytest -s test_listener_handshake.py::TestCases::test_initiator_syn # Modify the file name and test case as needed
When running tests individually, remember that a green “pass” does not guarantee full credit. Always review the log messages to ensure no underlying errors remain.
Kathara Experiments
You can test UT-TCP in various network environments, such as by injecting packet losses.
For example, you can simulate packet drops using the following method.
To create an isolated environment, we recommend using Kathara labs.
In the kathara-labs directory, we provide two hosts (h1, h2) that can be deployed using Kathara.
The following steps demonstrate how to test the provided server and client examples under packet loss.
# Start Kathara environments
cd kathara-labs
kathara lstart
# H1 (Server)
kathara connect h1
cd /shared
# Optional: Add packet loss (adjust the percentage as needed)
# tcset eth0 --loss 0.1% --overwrite
UT_TCP_ADDR=10.1.1.3 UT_TCP_PORT=8000 ./server
# H2 (Client)
kathara connect h2
cd /shared
# Optional: Add packet loss (adjust the percentage as needed)
# tcset eth0 --loss 0.1% --overwrite
UT_TCP_ADDR=10.1.1.3 UT_TCP_PORT=8000 ./client
For grading, we will limit our test cases to packet loss up to 10%.
Similarly, you can check the correctness of data transmission using the following command. We expect no output to appear; the command will print messages when the files are different.
cmp -l tests/random.input tests/random.output
Report
How to run in Kathara
After implementing UT-TCP, you will conduct a small experiment to observe how congestion control affects data transmission.
In Kathara environments, run the following commands to obtain graphs showing the number of packets over time:
# H1
kathara connect h1
cd /shared
dd if=/dev/urandom of=tests/random.input count=1000  # Create a random file
# tcset eth0 --delay 50ms --overwrite
UT_TCP_ADDR=10.1.1.3 UT_TCP_PORT=8000 UT_TCP_FILE_SIZE=512000 ./server
# H2
kathara connect h2
cd /shared
# tcset eth0 --loss 0.1% --overwrite
UT_TCP_ADDR=10.1.1.3 UT_TCP_PORT=8000 UT_TCP_FILE_SIZE=512000 CONG_WIN_LOG_PATH=cong_win.csv ./client
After logging congestion windows, run the following command to visualize congestion window changes over time:
# Either H1 or H2
cd /shared
CONG_WIN_LOG_PATH=cong_win.csv python plot_cong_wind.py
This will generate [CONG_WIN_LOG_PATH]_graph.png. An example is shown in the following figure (with loss 0.1%).
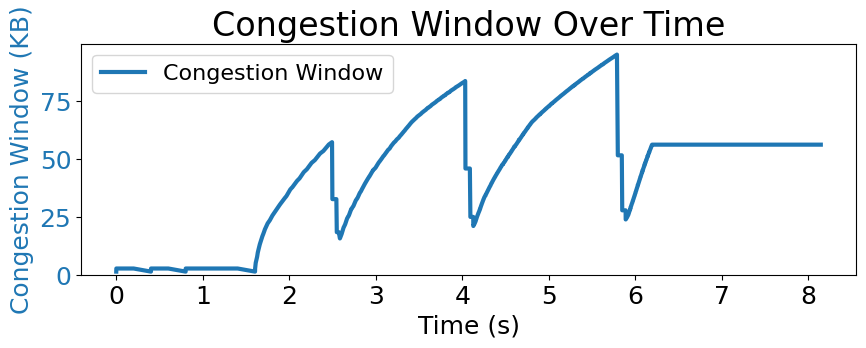
You will be able to observe how the congestion window changes over time under intermittent packet losses.
Deliverable
In your report: (1) include the generated figures and describe the results for each scenario, and (2) discuss possible ways to improve TCP Reno.
When describinb results, focus on:
-
How the congestion window changes compared to Scenario 1 (e.g., growth rate, saw-tooth behavior)
-
Overall performance (e.g., total time required to send the entire file)
Scenario1: without any congestion (tcdel --device eth0)
# Server
dd if=/dev/urandom of=tests/random.input bs=1k count=10000
tcdel --device eth0
UT_TCP_ADDR=10.1.1.3 UT_TCP_PORT=8000 UT_TCP_FILE_SIZE=10240000 ./server
# Client
tcdel --device eth0
time UT_TCP_ADDR=10.1.1.3 UT_TCP_PORT=8000 UT_TCP_FILE_SIZE=10240000 CONG_WIN_LOG_PATH=cong_win_scenario1.csv ./client
Scenario2: Intermittent loss (loss rate = 0.1%)
# Server
dd if=/dev/urandom of=tests/random.input bs=1k count=10000
tcset eth0 --loss 0.1% --overwrite
UT_TCP_ADDR=10.1.1.3 UT_TCP_PORT=8000 UT_TCP_FILE_SIZE=10240000 ./server
# Client
tcset eth0 --loss 0.1% --overwrite
time UT_TCP_ADDR=10.1.1.3 UT_TCP_PORT=8000 UT_TCP_FILE_SIZE=10240000 CONG_WIN_LOG_PATH=cong_win_scenario2.csv ./client
Scenario3: High RTT (delay = 100ms)
# Server
dd if=/dev/urandom of=tests/random.input bs=1k count=10000
tcset eth0 --delay 100ms --overwrite
UT_TCP_ADDR=10.1.1.3 UT_TCP_PORT=8000 UT_TCP_FILE_SIZE=10240000 ./server
# Client
tcset eth0 --delay 100ms --overwrite
time UT_TCP_ADDR=10.1.1.3 UT_TCP_PORT=8000 UT_TCP_FILE_SIZE=10240000 CONG_WIN_LOG_PATH=cong_win_scenario3.csv ./client
Scenario4: Slow network (bandwidth = 100Kbps)
# Server
dd if=/dev/urandom of=tests/random.input bs=1k count=10000
tcset eth0 --rate 100Kbps --overwrite
UT_TCP_ADDR=10.1.1.3 UT_TCP_PORT=8000 UT_TCP_FILE_SIZE=10240000 ./server
# Client
tcset eth0 --rate 100Kbps --overwrite
time UT_TCP_ADDR=10.1.1.3 UT_TCP_PORT=8000 UT_TCP_FILE_SIZE=10240000 CONG_WIN_LOG_PATH=cong_win_scenario4.csv ./client
Scenario5: Mid-flow congestion
# Server
dd if=/dev/urandom of=tests/random.input bs=1k count=10000
tcdel --device eth0
UT_TCP_ADDR=10.1.1.3 UT_TCP_PORT=8000 UT_TCP_FILE_SIZE=10240000 ./server
# Client
tcdel --device eth0
time UT_TCP_ADDR=10.1.1.3 UT_TCP_PORT=8000 UT_TCP_FILE_SIZE=10240000 CONG_WIN_LOG_PATH=cong_win_scenario5.csv ./client & sleep 3 && tcset eth0 --rate 10Kbps --overwrite && sleep 3 && tcdel --device eth0
How to improve TCP Reno: Discuss potential enhancements to TCP Reno. You may consider different network scenarios (e.g., bursty traffic, heterogeneous workload patterns) and reason about how modifying the congestion window behavior could improve throughput, fairness, or responsiveness. Focusing on a single limitation of Reno and proposing one concrete improvement is sufficient.
Submission
Please submit your code (assignment3 repository) and report on Canvas.
The naming format for the code is assign3_[firstname]_[lastname].tar.gz and for the report is assign3_[firstname]_[lastname].pdf.
Grading
- Implementation (80%)
- Report (20%)
Your implementation will be automatically graded based on the following criteria:
- Handshake
- Flow Control
- Congestion Control
- End-to-End Test Cases (e.g., reliable file transfer under packet loss)
Tips
Locating the First Discrepancy: To identify the position of the first byte mismatch between the two files, run the following command.
cmp -l tests/random.input tests/random.output | head -n 1
The output displays three columns: the byte number, the value in file 1, and the value in file 2.
Initial Sequence Number (ISN): When debugging, it can be helpful to set ISN = 0.
The ISN is initialized in ut_tcp.c:ut_socket() by setting sock->send_win.last_ack.
Acknowledgement
This assignment is modified from the CMU Computer Networks course (CMU 15-441/641) assignments. No part of this assignment may be copied or distributed without the express permission of the course staff.