
Assignment 3: Supporting ARP, ICMP, RIP in the Router
Released: 02/27/2025
Due: 03/13/2025
- Part 0: Setup
- Part 1: ICMP
- Part 2: ARP
- Part 3: RIP
- Submission
- Appendix: Table Insertion API for
controller.py
Part 0: Setup
- Clone the skeleton code to your private repository.
- To obtain the skeleton code, create a private repository by selecting
Use this template> Create a repositoryon the GitHub repository page. - Don’t forget to select
Privatewhile creating the repository.
- To obtain the skeleton code, create a private repository by selecting
- You should instantiate your experiment in the same way as the previous assignments.
- Make sure to use profile
cs356-base - Make sure to specify your group during instantiation.
- Make sure to use profile
- You should execute
$ bash setup.shupon every$ git cloneand$ git pull.- The script will automate updating your change in the
srcdirectory to thelabsdirectory by creating a hard link for each file insrc. - Otherwise, you must copy and paste your code whenever you make changes.
- The script will automate updating your change in the
- Do NOT modify the provided skeleton code other than the commented as
PARTn_TODO(e.g.,PART1_TODO).- In this assignment, a lot of skeleton code is doing tedious work on your behalf, so you can focus on the core logic.
- You can just read the comments to understand the skeleton code.
- Part 3 topology has six routers, so we recommend you use multiple
tmuxwindows.- Other than splitting a window into panes, you can create a new tmux window within a session by typing
Ctrl+b c. After creating windows, you can navigate the windows usingCtrl+b pandCtrl_b n. (Don’t forget to pause after Ctrl+b) - Please refer to here for more details on how to use
tmux.
- Other than splitting a window into panes, you can create a new tmux window within a session by typing
Part 1: ICMP
Overview
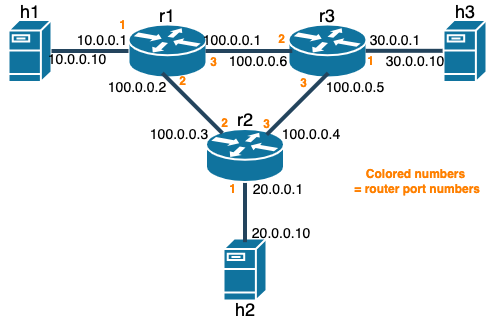
Your tasks are implementing part of ICMP protocol support on src/l3_routing.p4. The tasks are commented as PART1_TODO in the p4 file. If you have done the setup correctly, your source code also should appear in the labs/part1_icmp/shared directory. The changes on one file will be reflected in the other. The ARP and routing table are static in this part of the assignment. The Kathara lab for this part is located in labs/part1_icmp. The virtual network topology is illustrated below.
Tasks
All the tasks are on the src/l3_routing.p4 file.
Task 1: If the arriving IPv4 packet’s TTL field is 1, send an ICMP Time Exceeded message to the sender of the packet.
- First, call
action send_ICMP_errorwith typeICMP_TYPE_TIME_EXCEEDED(11 or 0x0b) and code0. - Then modify the source IP address of the packet to the IP address of the ingress port by applying the
icmp_ingress_port_iptable.
Task 2: If the arriving IPv4 packet’s destination IP is one of the router’s IP, handle the packet.
- If the packet is an ICMP echo request packet, send an ICMP echo reply by calling
action send_ICMP_echo_reply - Complete the
action send_ICMP_echo_replyfollowing the instructions on the skeleton code. You may refer to theaction send_ICMP_error. - Else if the packet is either TCP or UDP packet, send an ICMP error using
send_ICMP_errorwith typeICMP_TYPE_DEST_UNREACAHBLE(3) and codeICMP_CODE_PORT_UNREACHABLE(3).
Test your implementation
- Compile the P4 code and launch the P4 and controller program on the routers (
r[1-3]).- All the necessary commands are provided as script files in the Kathara lab’s
shareddirectory. - After starting the Kathara lab, compile the P4 code with
$ bash compile_p4.shon one of the routers (e.g.,r1) after$ cd /shared. - Then, on each router, launch the compiled P4 program with
$ bash run_router.shand the controller with$ bash r[1-3]_run_controller.sh.
- All the necessary commands are provided as script files in the Kathara lab’s
- Test the functionality.
- For Task 1, try to run
$ traceroute 20.0.0.10onh1. It basically sends packets with small RTTs (incrementing by 1 until the packet reaches the destination) to examine the route to the destination. If you implement it correctly, you should be able to see the route to20.0.0.10(h2) fromh1. - For Task 2, try to run
$ ping 10.0.0.1onh1(i.e., ping tor1). It should work properly if you implement Task 2 correctly. Also, try to run$ wget 10.0.0.1onh1. It will try to send a TCP packet tor1and should return an error immediately.
- For Task 1, try to run
Part 2: ARP
Overview
Your tasks are implementing part of ARP protocol support on src/l3_routing.p4 and src/controller.py. The tasks are commented as PART2_TODO in the p4 and python files. If you have done the setup correctly, your source code also should appear in the labs/part2_arp/shared directory. The changes on one file will be reflected in the other. The routing table is static in this part of the assignment. The Kathara lab for this part is located in labs/part2_icmp. The virtual network topology is illustrated below.
Tasks
Task 1 is on the src/l3_routing.p4 file and Task 2 is on the src/controller.py file.
Task 1: Complete the action send_ARP_response on the p4 file.
- Refer to the skeleton code for detailed instructions.
- This action will be invoked upon ARP request on one of the router’s network interfaces.
- It changes an incoming ARP request to an ARP reply and sends the reply to who sends the request.
Task 2: Complete the ARP reply handling on the python file.
- Refer to the skeleton code for detailed instructions.
- Once the router receives the ARP reply, it forwards the reply to the controller.
- Then the controller should install the ARP table and forwarding table using the information in the ARP reply packet.
- Your job here is to insert the
arp_tableanddmac_forwardtable entries into the router data plane. - It should be quite similar to what you’ve done in A2.
Test your implementation
- Compile the P4 code and launch the P4 and controller program on the routers (
r[1-3]).- All the necessary commands are provided as script files in the Kathara lab’s
shareddirectory. - After starting the Kathara lab, compile the P4 code with
$ bash compile_p4.shon one of the routers (e.g.,r1) after$ cd /shared. - Then, on each router, launch the compiled P4 program with
$ bash run_router.shand the controller with$ bash r[1-3]_run_controller.sh.
- All the necessary commands are provided as script files in the Kathara lab’s
- After implementing both tasks, try running
$ ping 20.0.0.10onh1. It should work, and the ARP request and reply packets should appear along the path. You may check these with$tcpdump—i any arponr1andr2.
Part 3: RIP
Overview
Your tasks are implementing part of RIP protocol support on src/controller.py. The tasks are commented as PART3_TODO in the python file. If you have done the setup correctly, your source code also should appear in the labs/part3_rip/shared directory. The changes on one file will be reflected in the other. The routing table is static in this part of the assignment. The Kathara lab for this part is located in labs/part3_rip. The virtual network topology is illustrated below.

Tasks
All the tasks are on the src/controller.py file.
Task 1: Complete the mergeRoute method of the Route class.
- The
Routeclass stores routing information (i.e., next hop IP and cost). - The information would be associated with a certain destination IP address and stored in the
routing_tabledictionary. - Refer to the skeleton code for detailed specifications.
Task 2: Complete the RIP response handling logic.
- Your task is handling the routing table entry updates and installations.
- Once the router receives an RIP response, it forwards the packet to the controller.
- Then, the controller should update or install the routing table entries if the routes in the RIP response are for unknown destinations or known but with cheaper costs.
- When you build the table entry for
ipv4_route(a LPM table), use a prefix length of 32 for thematch_fieldsparameter ofp4info_helper.buildTableEntry. In part 3, we don’t use the notion of a subnet for simplicity. - When you update an existing table entry, specify
is_modify=Trueas the parameter ofs1.WriteTableEntry. - Refer to the skeleton code for more detailed specifications.
Test your implementation
- Compile the P4 code and launch the P4 and controller program on the routers (
r[1-6]). You may want to test your program on the subset of the routers to ease debugging.- All the necessary commands are provided as script files in the Kathara lab’s
shareddirectory. - After starting the Kathara lab, compile the P4 code with
$ bash compile_p4.shon one of the routers (e.g.,r1) after$ cd /shared. - Then, on each router, launch the compiled P4 program with
$ bash run_router.shand the controller with$ bash r[1-6]_run_controller.sh.
- All the necessary commands are provided as script files in the Kathara lab’s
- After implementing both tasks, try to ping to
h[2-6]onh1. It should work properly. You may verify the routing table information on each controller’s stdout. It will dump the routing table every 10 seconds.
Submission
Please submit your code (modified assignment3 repository) to the Canvas Assignments page in either tar.gz or zip format.
The naming format for the file is assign3_groupX.[tar.gz/zip].
Appendix: Table Insertion API for controller.py
- Create a table entry you want to insert.
In the skeleton code, the instance of the
helperclass,p4info_helper, is already created and initialized. Its role is to interpret the human-readable format of P4 objects in the way that the P4 program understands. To build a table entry in a way that the P4 program understands, you can use thehelperclass’sbuildTableEntry()method. Its API is described below.def buildTableEntry(self, table_name, # human-readable table name in string match_fields=None, # a dictionary with a human-readable match field as a key and its value as a value default_action=False, # human-readable default action name in string (This is not necessary if you already define the default_action in the P4 code) action_name=None, # human-readable action name in a string (This action is executed upon hit) action_params=None, # a dictionary with a human-readable action parameter name as a key and its value as a value priority=None # unused in our case ):For the value for the
match_fieldsandaction_paramsdictionaries, here’s a guideline to the format of the value:- IP address: String in the dotted decimal notation (e.g.,
10.0.0.1) - IP prefix for longest prefix matching: a tuple with IP prefix in string and prefix length in integer. (e.g.,
(10.0.0.0, 24)which means the table key is in the range10.0.0.[1-255]) - MAC address: String in the
xx:xx:xx:xx:xx:xxformat (e.g.,00:00:0a:00:00:01) - Port number: Integer
To set a timeout, you should change the attribute,
idle_timeout_ns, of the table entry as below in integer and the unit of nanoseconds.table_entry.idle_timeout_ns = int(1 * 1e9) # timeout is 1 secondFor more details, refer to the file,
assignment2/labs/star_four_hosts/shared/utils/p4runtime_lib/helper.py. - IP address: String in the dotted decimal notation (e.g.,
- Send a table entry to the switch.
The
Bmv2SwitchConnectionobject,s1, is provided and initialized. The object is the abstraction of a connection between the switch and the controller. To add a table entry you built in the above step, you can simply call theWriteTableEntrymethod of theBmv2SwitchConnectoinobject withtable_entryas a parameter. (e.g.,s1.WriteTableEntry(table_entry))
Usage example
Say there’s a l2_simple_switch.p4, and it defines a table in the ingress control block as below.
...
control MyIngress() {
    table dmac_forward {
        key = {
            hdr.ethernet.dstAddr: exact;
        }
        actions = {
            forward_to_port;
            drop;
        }
        size = 4;
        default_action = drop;
    }
    ...
}
When you compile this program, the compiler will create l2_simple_switch.p4info.txt. The P4info file contains a human-readable name to an instance id (integer) mapping. You can retrieve the arguments for the buildTableEntry method from here. Below is the example code snippet from the controller code used in the in-class demo.
mac_to_port = {"00:00:0a:00:00:01":1,
            "00:00:0a:00:00:02":2,
            "00:00:0a:00:00:03":3,
            "00:00:0a:00:00:04":4}
for eth_src_addr, port_id in mac_to_port.items():
    table_entry = p4info_helper.buildTableEntry(
        table_name="MyIngress.dmac_forward",
        match_fields={"hdr.ethernet.dstAddr": eth_src_addr},
        action_name="MyIngress.forward_to_port",
        action_params={"egress_port": port_id}
    )
    s1.WriteTableEntry(table_entry)